How to create a payment (SEPA/NON-SEPA, domestic or international)
Choosing your ordering account and account currency
Choosing your beneficiary
- Choose an Amount and currency
- Choose an execution date
- Choose message to beneficiary or structured communication
- Choose customer reference (or end to end identifier)
Define additional payment data
- Share the transaction to all users in the same ebanking contract
- Send when sufficiently signed
- Invite potential signers
How to access
- Select the Transactions tab
- Select Payment from the left navigation menu
![]()
Choosing your ordering account and account currency
In payment data, select your Originator alias from the dropdown list. Alternatively you can also search based on the account holder, account number or the alias. Once selecting, the details of the ordering account will be displayed.
In case you are using a multi-currency account, you will be able to modify the account currency.
![]()
Choosing your beneficiary
You can choose to create a payment to a beneficiary (a previously saved counterparty or new one) or an own account.
Using a saved counterparty
![]()
You can search your beneficiary by typing the leading character of the alias, account number or name in the corresponding field. Once you have found your counterparty, verify if all required fields are filled in.
In case the counterparty has multiple account numbers, you will have to select it from the list.
TIP: You can modify your counterparty right from the payment wizard (modified fields will be shown in italic). You can choose to not update your beneficiary by unchecking the “Update this beneficiary” option.
![]()
Using a new beneficiary
![]()
Encode the required fields based on the information your beneficiary has provided. Click on the “more” link to complete your beneficiaries address.
- Alias: an easy to remember name of your counterparty. This will not be visible for your beneficiary
- Account country: the country of the beneficiaries bank account
- Account number: the account number of your beneficiary. An IBAN is preferred for SEPA payment. For NON-SEPA payments you can choose to use another format by selecting “Edit account format”.
- BIC: the bank identifier code or your counterparty. A BIC is mandatory for SEPA payment. For NON-SEPA payments you can click on “Search” to choose a “Clearing code” or “Bank name” instead of the BIC.
- Name and address: the name and address of your counterparty. This will be visible for your beneficiary.
Remark: when clicking on “Finish” or “Next payment”, your encoded values will be validated. The border of incorrect fields will be marked red and a message will inform you what is wrong.
Using an own account
Select “Own account” in case you want create a payment to with an own account as beneficiary.
This list is populated by your banks. In case one of your accounts is missing or incorrect, contact the bank of the beneficiary account.
![]()
Define common payment data
![]()
Choose an Amount and currency
- Encode the amount you want transfer. For Euro, the amount is limited to 999.999.999,99. Other currencies may have different limits.
- Choose the currency of your transfer. In case the currency is different from the currency of your ordering account, you can specify additonal exchange options.
TIP: You can choose to save this amount by selecting “Update this beneficiary”, next check the option “Save this amount and currency as default”.
Choose an execution date
The execution date will automatically be set to today. Choose another execution date in case the payment must be executed in the future.
Choose message to beneficiary or structured communication
Encode a message to your beneficiary or use a structured communication (only available for Belgian payments)
TIP: You can choose to save this message by selecting “Update this beneficiary”, next check the option “Save this message as default”.
Choose customer reference (or end to end identifier)
Encode a customer reference or use the default assigned ID. This is used for tracking your payment in your accounting or ERP software. Both you as your beneficiary will be able to view this ID.
This is a mandatory field.
Define additional payment data
Once the payment data is completed, you can choose to define additional payment data. Click on “Define additional payment data” to show additional options regarding the execution of your payment.
![]()
- Reason of payment: Define the reason of your payment (example Salary, tax, Treasury,…)
- Create a High priority payment: Choose to execute your payment with high priority. Please contact your bank for more information and possible additional costs.
-
NON-SEPA fields: When you payment is classified as NON-SEPA, additional fields will become available while configuring the additional payment data.
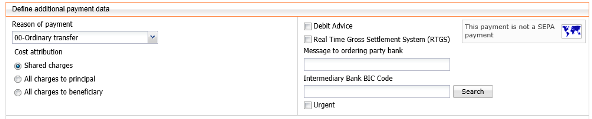
- Cost attribution: choose who must bear the costs of the payment.
- Cost account: in case the cost attribution is set to “Shared charges” or “All charger to principal”, a cost account must be provided. In case you choose a different account then the ordering account, make sure your bank supports this.
-
Choose exchange options
- Payment modality: Choose to pay the desire amount in the configured currency or to pay the counter value of the amount (currency of the ordering account) to the desire currency.
- Exchange method: leave this blank or select the option Exchange rate as per contract number, where you will have to specify the contract number.
- Define Message to ordering party or beneficiary bank: Specify a message to ordering party bank or the beneficiary bank.
- Define BIC of intermediary bank: Specify an intermediary bank BIC
Advanced processing options
Once the payment data is completed, you can choose to define advanced processing options. Click on “Set advanced processing options” to show processing options for your payment.
- Share the transaction to all users in the same ebanking contract: Share the transaction to anyone in your subscription with access to the eBanking contract.
- Send when sufficiently signed: When the transaction is sufficiently signed, Multiline will automatically send the transaction to your bank.
![]()
Invite potential signers
When inviting a potential signer, the invited user will receive a mail (only if the signer has configured an email address in the preferences > General) informing him a transaction is ready to be signed.