How to upload banking files
Hide the details for potential signers, assign to an envelope and share the transaction to all users in your contract
View upload process and verify warnings or errors
Invite potential signers and modify “Send when sufficiently signed”
How to access
- Select the Transactions tab
- Select Upload of files, from the left menu
Uploading banking files
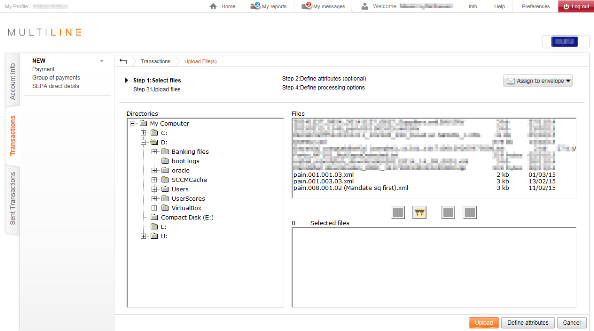
Step 1: Select files

-
Use Directories to browse to the folder where your files are located. Once you have located your folder, click on the name of the folder. All files in this folder will be displayed in the field Files.Common default directories are:
- Desktop: C:Users[your username]Desktop
- Your documents: C:Users[your username]Documents
- Select the files you want to upload from the field Files. You can select multiple files by holding down the CTRL button and selecting your files with the mouse.
-
Use the
 button to move the selected files to the field Selected files. You can use
  to move all the files in the directory in the field Selected files.
To remove a file from the field Selected files, use the or
or  to remove the (selected) files from the field Selected files
 - Once the files you want to upload are located in the “Selected files” part, you can choose between 3 options:
- Upload: will continue to Step 3: Upload files
- Define attributes: will continue to Step 2: Define attributes, an optional step providing you the options to hide the details, share the transaction,…
- Cancel: Stop the Upload of files and return to the Transactions tab
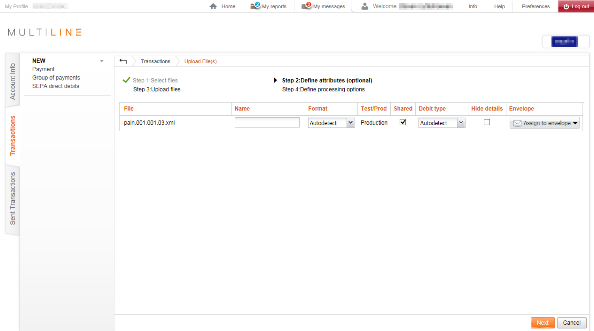
Step 2: Define attributes

From Step 2: Define attributes you can:
- Specify another name that will be displayed in transaction overview after uploading. By default the “Uploaded payment file: [Filename]” will be used
- Specify the format of your file. By default Multiline will automatically detect the type of your banking file, it is therefore not required to modify this. In case your file is not supported by Multiline, you will be required to specify the format and bank in Step 3: Upload files (if you are connected to a bank that supports this).
- Choose to select Shared in case everybody that is connect to the corresponding eBanking contract may view your upload file. By default only the potential signers and the uploader will be able to view the banking file.
- Choose to select Hide details in case you want to hide the content of your file for anybody who has access to. Once hidden, only the uploader will be able to view the details.
Remarks:- In case you want to hide the details (use global debit) in account information, you must activate global debit while creating your file in your ERP or accounting software. Consult the user manual of your ERP or accounting software for more information.
- You cannot revert hide details
- Selecting Hide details will be mentioned in the Audit trail
- Assign your file to an envelope. You can also manage your envelopes from the Transactions.
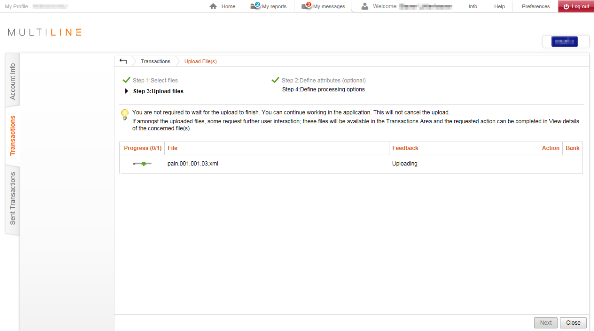
Step 3: Upload files

Your files will be uploaded and processed. This process might take some time depending on the amount of transactions and your connection speed.
-
 : Currently uploading the bank file
 -
 : The upload of the file is successfully completed
 -
 : The file has an incorrect structure.
 -
 : The file contains warnings or is an unknown type
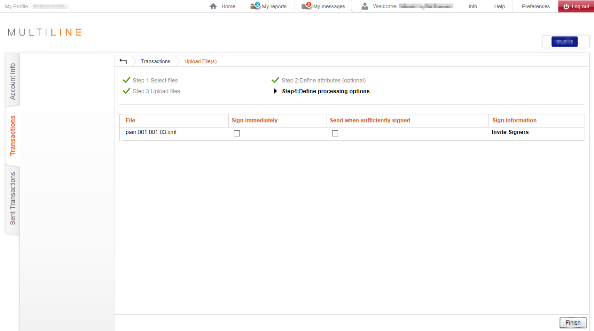
Step 4: Define processing options

- Sign immediately: specify if you want to sign the transaction when clicking Finish. No checkbox is available in case you are not allowed to sign the banking file
- Send when sufficiently signed: specify if you want them to automatically be send to the bank if all signers have signed the transaction.
- Invite signers: will show a popup where you can invite potential signers for the corresponding banking file.
